lunedì 19 dicembre 2022

Restore the Legacy Print Dialog in Windows 11 22H2


Restore the Legacy Print Dialog in Windows 11 22H2

In Windows 11 22H2, Microsoft has replaced the legacy Print Dialog for all classic (win32) apps, e.g., Notepad, WordPad, Notepad++, etc., with a new dialog. Earlier, this dialog was available only for UWP apps (aka Store apps). Also, there is a new Print Queue dialog introduced in this version.

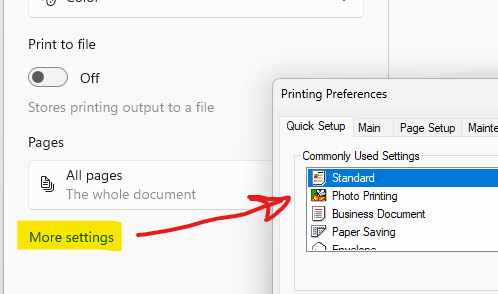
However, in the modern print dialog, the preview pane always shows “No preview available,” irrespective of the previewed file type. Furthermore, on some systems, the title bar reads “Printing from Win32 application” instead of the program’s name — e.g., Notepad++.

get back legacy print dialog in windows 11 22h2

To access the printer preferences dialog (specific to the chosen printer), click on the “More settings” link at the bottom left of the new print dialog.

get back legacy print dialog in windows 11 22h2

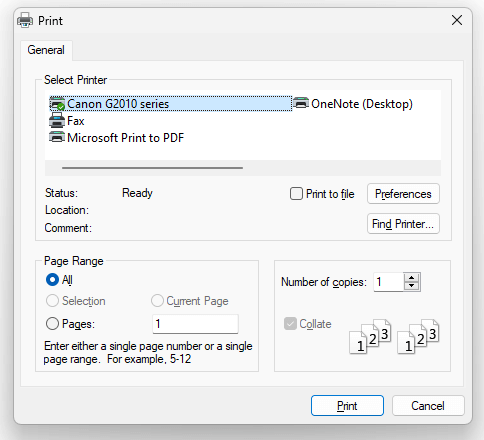
If you see no use in this new Print dialog, fortunately, you can revert to the old/legacy Print dialog in Windows 11 22H2.

Restore the Old Print Dialog in Windows 11 22H2

Follow one of these methods to bring back the old print dialog in Windows 11.

Using Command Prompt

Open a Command Prompt window:

Type the following command exactly as given below, and press Enter:

reg add "HKCU\Software\Microsoft\Print\UnifiedPrintDialog" /v "PreferLegacyPrintDialog" /d 1 /t REG_DWORD /f

If the command was executed correctly, you should see the message “The operation completed successfully.

get back legacy print dialog in windows 11 22h2

Using Registry Editor

Alternately, you can start the Registry Editor (regedit.exe) and go to the following branch:

HKEY_CURRENT_USER\Software\Microsoft\Print\UnifiedPrintDialog

Create a new REG_DWORD value named PreferLegacyPrintDialog

Set PreferLegacyPrintDialog data to 1.

Exit the Registry Editor.

REG File to automate or deploy the above setting.

Windows Registry Editor Version 5.00

[HKEY_CURRENT_USER\Software\Microsoft\Print\UnifiedPrintDialog]
"PreferLegacyPrintDialog"=dword:00000001

I hope that helps. Let’s know.


One small request: If you liked this post, please share this?

One "tiny" share from you would seriously help a lot with the growth of this blog. Some great suggestions:
  • Pin it!
  • Share it to your favorite blog + Facebook, Reddit
  • Tweet it!
So thank you so much for your support. It won't take more than 10 seconds of your time. The share buttons are right below. :)

giovedì 29 settembre 2022

Risoluzione problema del crash di MS Word 2000, XP e 2003

 Risoluzione problema del crash di MS Word 2000, XP e 2003, riguardante il correttore ortografico (msgrit32.dll).

– In Strumenti > Opzioni correzione automatica > Smart Tag, disattivare “Contrassegna testo con smart tag”.

altre possibili soluzioni:

– In Strumenti > Opzioni > Ortografia e Grammatica, disattivare le caselle “Controlla ortografia durante la digitazione” e “Controlla grammatica durante la digitazione”

– Rinominare il file msgrit32.dll

venerdì 15 luglio 2022

Spostare rete windows da pubblica a privata (per seconde reti/openvpn server)

Per verificare se la rete interessata è su pubblica o privata, dal pannello di controllo -> firewall


Da powershell lanciare: get-netconnectionprofile

poi con  set-netconnectionprofile -name "OpenVPN TAP-Windows6" -NetworkCategory Private

cambiare OpenVPN TAP-Windows6 con il nome della rete da passare a privata


(fonte: https://www.digitalcitizen.life/how-set-your-networks-location-private-or-public-windows-10/)

giovedì 26 maggio 2022

Installa Windows 11 Home senza rete/account ms


How to install Windows 11 Home without Microsoft Account

To install Windows 11 Home without Microsoft Account or an Internet connection, follow these steps:

  1. Continue with the installation process as usual.
  2. Press Shift+F10 when it asks for an internet connection.
  3. Type taskmgr and hit the Enter button.
  4. Click on the More details button.
  5. Find out the Network Connection Flow process. (Flusso di rete)
  6. Select it and click the End task button.
  7. Close all windows and enter your name and password to continue.
OPPURE

  1. On the “Oops, you’ve lost internet connection” or “Let’s connect you to a network” page, use the Shift + F10 keyboard shortcut.

  2. In Command Prompt, type the OOBE\BYPASSNRO command to bypass network requirements on Windows 11 and press Enter.


giovedì 5 maggio 2022

NET::ERR_CERT_DATE_INVALID.

 Ho avuto lo stesso problema con mac os 10.11 e l’ho risolto scaricando il nuovo certificato da questa pagina: https://letsencrypt.org/certificates/

Il certificato da scaricare è nella riga:
Self-signed: der, pem, txt
[cliccare su “der”]
Dopodiché va installato nel portachiavi, nella categoria “Certificati”. Ora basta trascinare il file scaricato nella finestra a destra e il gioco è fatto.

mercoledì 23 febbraio 2022

[Risolto] Word non ha potuto creare il file di lavoro

 Questo errore può comparire all’apertura di Microsoft Word. In particolare l’errore che compare in un popup non appena si apre o si carica l’anteprima di un documento è il seguente:

Word non ha potuto creare il file di lavoro. Controllare la variabili temporanea di ambiente.

Per risolverlo è possibile seguire il seguente metodo.

  • Aprire regedit da Start
  • Navigare fino a “Computer\HKEY_CURRENT_USER\SOFTWARE\Microsoft\Windows\CurrentVersion\Explorer\User Shell Folders” (senza apici)
  • Cercare la chiave Cache
  • Cambiare il valore con “%USERPROFILE%\AppData\Local\Temp” (senza apici)

Dato che la modifica di chiavi di sistema può comportare problemi all’uso di Windows, si consiglia di copiare il valore precedente della chiave per poterla eventualmente ripristinare.

Nel caso in cui il problema non fosse ancora risolto, è possibile verificare che il valore della chiave appena modificata sia corretto cercando la variable d’ambiente “TEMP” o “TMP” navigando in Start > “Variabili di sistema” ed eventualmente sostituendola con quella inserita in precedenza.

ATTENZIONE: SE NON FUNZIONA ABBIAMO NOTATO CHE DA ALCUNI CLIENTI LA CARTELLA TEMPORANEA AVEVA CAMBIATO DEGLI ATTRIBUTI (FILE DI SISTEMA)

PROVARE A RICREARE LA CARTELLA TEMP


lunedì 7 febbraio 2022

problemi accesso websdg

 Se si hanno problemi di accesso bisogna cancellare il file webSGD.ini contenuto nella seguente cartella:

C:\Users\Erika\AppData\Local\Programs\WebSGD